

Injection Molding Parameter Tuning: Speed, Pressure & Temperature

How to Adjust Injection Molding Parameters? The Golden Ratio of Speed, Holding Pressure & Temperature
I've seen too many operators get frantic the moment they step up to the machine — cranking up injection pressure, turning up the temperature, fiddling for half a day, only to end up with flash and burrs everywhere, or sink marks that just won't go away. Then they blame the material and the mold, wasting raw materials and time for nothing.
The truth is, injection molding machine adjustment is never about blind trial and error — it relies on a clear set of logic. Today I'll break down this closely-guarded tuning logic diagram thoroughly, helping you get a crystal-clear understanding of the three core parameters — injection speed, holding pressure, and temperature — and doubling your tuning efficiency.
I. What Do the Three Core Parameters Actually Control?
The root reason many operators can't tune a machine well is that they don't understand what each parameter does, so they mess up the order and make things worse. Let's first clarify the division of labor among these three "key players."
1. Injection Speed: The "Sprint Phase" of Injection Molding
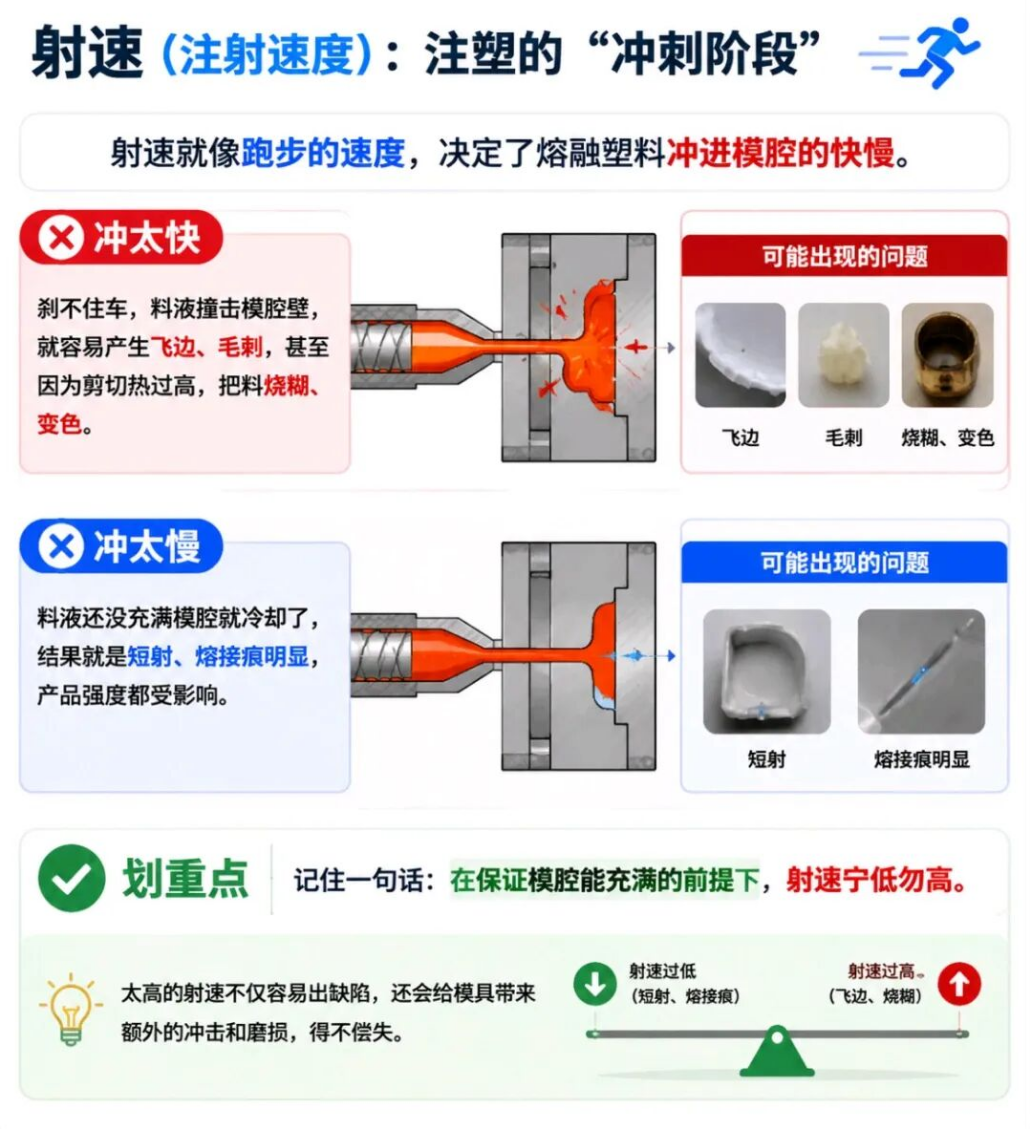
Injection speed is like running speed — it determines how fast the molten plastic rushes into the mold cavity.
Too fast: it can't stop in time, and the melt slams into the cavity walls, easily causing flash and burrs — or even burning and discoloring the material due to excessive shear heat.
Too slow: the melt cools down before it can fill the cavity, resulting in short shots, obvious weld lines, and even compromised product strength.
2. Holding Pressure (Pressure/Time): The "Final Compaction Phase"
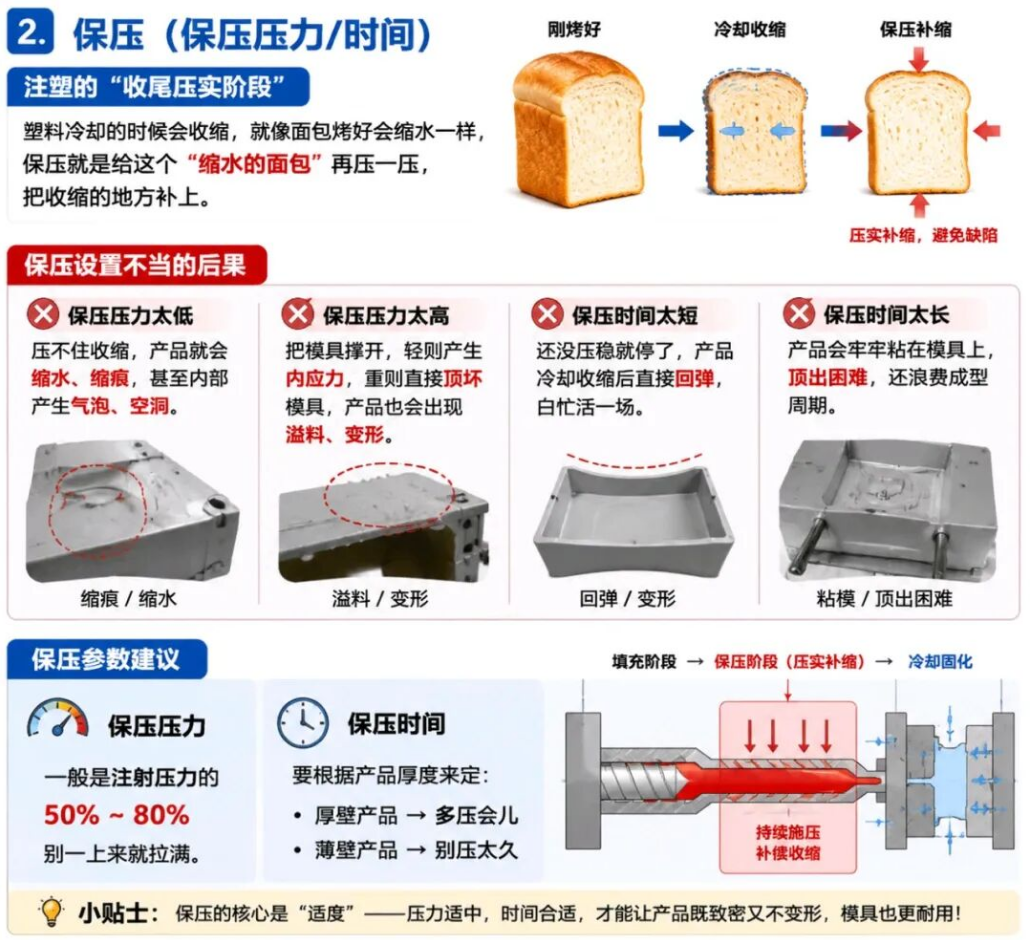
Plastic shrinks as it cools, just like bread shrinks after baking. Holding pressure is like pressing down on that "shrinking bread" to make up for the contraction.
Holding pressure too low: it can't suppress shrinkage, so the product develops sink marks — and may even form internal bubbles or voids.
Holding pressure too high: it forces the mold open — at best creating internal stress, at worst directly damaging the mold, while the product also suffers from overflow and deformation.
Holding time too short: it stops before the part is compacted, and the product springs back after cooling shrinkage — all for nothing; if the time is too long, the product sticks firmly to the mold, making ejection difficult and wasting the molding cycle.
3. Temperature (Barrel/Mold Temperature): The "Warm-Up & Cooling" of Injection Molding
Temperature is like the heat level when cooking — with the wrong heat, even the best material won't produce a good product.
Barrel temperature too low: the material won't melt fully, flowability is poor, it's easy to underfill, and cold slug marks appear; if the temperature is too high, the material decomposes and discolors, its performance degrades directly, and it may even produce toxic gases.
Mold temperature too low: the melt cools instantly upon touching the mold wall, causing silver streaks and gas marks on the surface, and weld lines become very obvious; if the mold temperature is too high, the product cools slowly, the molding cycle lengthens, and it's prone to sticking and deformation.
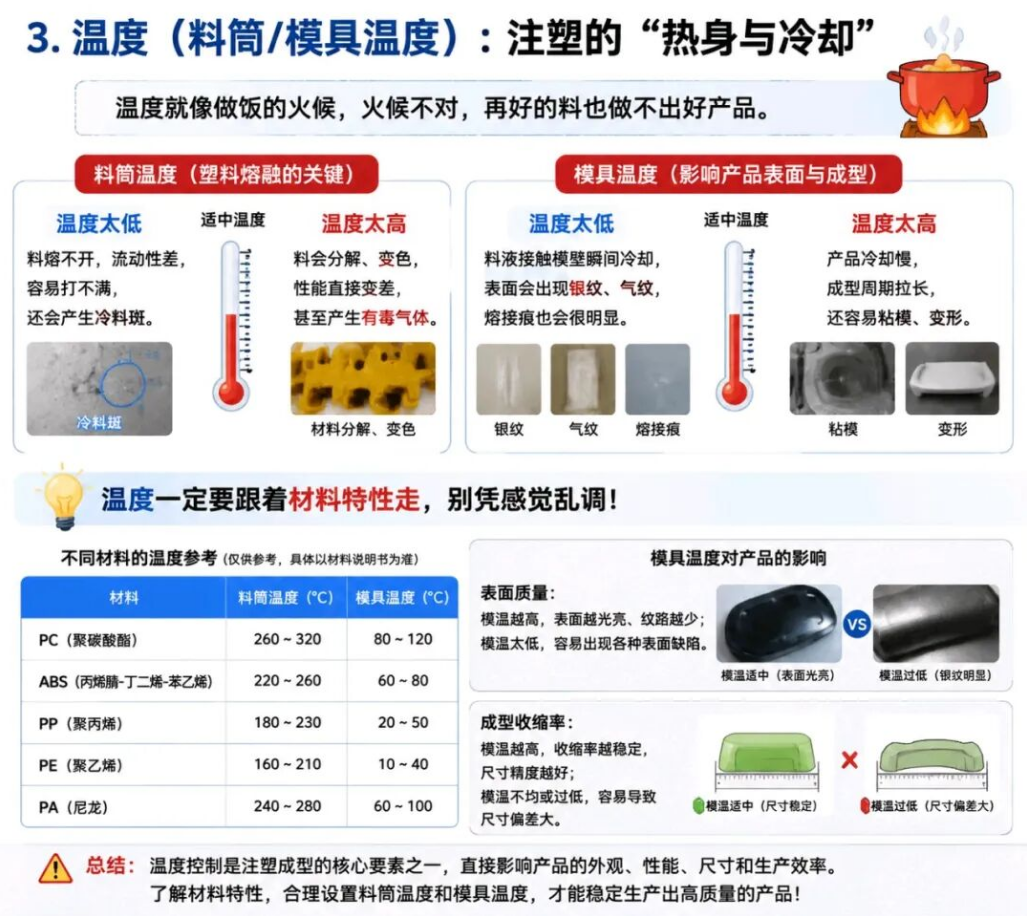
Temperature must always follow material characteristics — don't adjust it by feel. For example, PC requires high temperatures while PP needs lower temperatures. Mold temperature directly affects product surface quality and molding shrinkage rate, so it cannot be overlooked.
II. Ready-to-Use: "Speed–Pressure–Temperature" Golden Ratios for Common Materials
The biggest headache for many operators when tuning is "what parameter values are appropriate?" I've compiled general reference ranges for the four most commonly used materials in the industry — ABS, PP, PC, and Nylon. Beginners can follow them directly, and experienced operators can use them to benchmark their own parameters.
* Note: These are only general reference ranges. Specific parameters must always be adjusted in conjunction with your equipment, mold structure, product thickness, and raw material grade. Don't blindly apply them rigidly, or you'll easily fall into pitfalls.
III. Don't Mess Up the Tuning Order! Follow These Steps and Get It Right the First Time
Tuning isn't about adjusting whatever comes to mind — get the order wrong and no amount of adjusting will help. I've compiled a tuning sequence for you; follow it and your efficiency will double:
Set barrel temperature first: adjust the middle zone first, then the front and rear zones. Dry and melt the material thoroughly — this is the foundation of all parameters. If the temperature isn't right, nothing else you adjust afterward will matter.
Then set mold temperature: only with the mold temperature set will the molding environment be stable, and only then will subsequent parameter adjustments make sense. Otherwise, with mold temperature fluctuating up and down, parameters will never stabilize.
Adjust injection speed: first get the product filled completely with no obvious short shots or weld lines. Don't get hung up on flash issues at the start — solve the main contradiction first.
Adjust holding pressure: once the product is filled, adjust holding pressure to resolve sink marks and compact the product. Be careful not to increase it too much at once — ramp it up gradually.
Adjust holding time: once the pressure is set, adjust the time to ensure the product is dense without overflow, finding the balance point where there's neither sink nor mold sticking.
Record parameters and start batch production: always record the tuned parameters completely. Next time you change molds, use them directly — don't start from scratch every time, wasting time.
IV. Quick Fix Tips for Common Defects
Don't panic when you encounter problems during tuning. Here are several of the most common defects and their corresponding solutions:
Article Source: Injection Molding Memo
Disclaimer: The content and images contained herein are sourced from public channels such as the Internet and WeChat official accounts. We maintain a neutral stance toward the viewpoints expressed in this article, which is for reference and exchange only. The copyright of republished articles belongs to the original authors and institutions. If there is any infringement, please contact us for removal.

- < Previous : [Tech]Five Causes of Dim
- [Tech]IML vs IMD: 8 Key : Next >

- Stock Code
838363

- +86 186 6517 1961
+86 186 6687 8722
-




- Chat
- Top